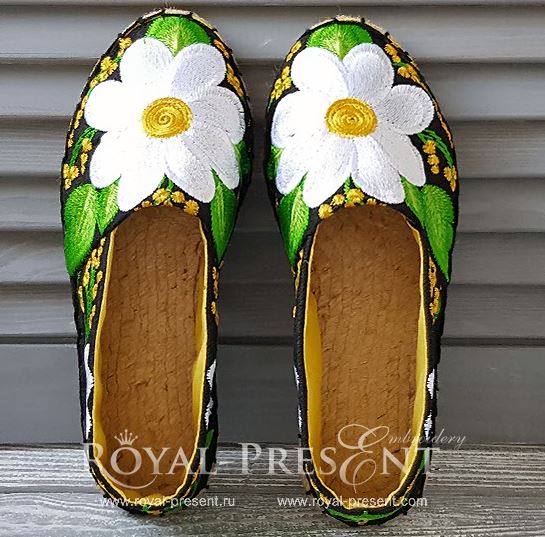
Ever wanted to have shoes made of flowers? Of daisies in particular? If yes, then you’re not alone. It all started with Prada going crazy for daisies it the shoes that instantly grabbed everyone’s attention. Then Dolce and Gabbana caught on the golden-white flower vibe, making us all wear daisies. After them Charlotte Olympia stunned us with her array of daises blooming on pip toes and sandals. Now Fabrizio Viti employs us to not eat daisies, planting them all over his gorgeous shoes.
Daises prove time after time that nothing, not even ever-so-changing fads could “pluck” them from their fashion throne. And why would it ever happen, what with the sweet, most sun-beamy charm and bright but elegant flair that they have? Thus we say: “Long live daisies on our shoes!” inviting every lady to dip her toes in summer with our Daisies Espadrilles Machine Embroidery Pattern.
Explore fascinating decorative possibilities of pretty white blooms with our Daisies Espadrilles Machine Embroidery Pattern. Pick your color, your favorite style of espadrilles, and the fabric you want them to be dressed with and start making your own shoes. You can take yellow colored Prym base kit and make absolutely sensational espadrille flats for your next summer-time getaway. For breezy urban summer vacations, crafty fashionistas can pull-off white daisies espadrille mules. Classic black espadrilles embroidered with daises is a tasteful choice for any outing be it a lazy Sunday branch or swanky after-hour beach party.
Daisies Espadrilles Machine Embroidery Pattern

If you’re a mommy of a little aspiring fashionista, than you definitely need to get matching pair of daisies espadrilles for her too. Officially starting from sizes 36-37 (UK 3-4), Daisies Espadrilles Machine Embroidery Pattern can easily be used for sizes 34-35 (UK 2-2,5).
NOTE: When working with espadrilles soles of sizes 34-35 (UK 2-2,5) you’ll need Daisies Espadrilles embroidery pattern of size 36-37 (UK 3-4). The pattern fits into the smaller size perfectly well. Just remember during the template cutting not to make seams allowances as you would for the bigger sizes.
Sounds confusing? Not at all! Read on and you’ll find a pretty easy step-by-step instruction for making gorgeous customized shoes. Give it a try! It’s not more difficult than painting by numbers – everyone can be an artist. Besides, you can actually wear your art!
So, are you ready to make your own flower – embroidered espadrilles? Ok then, let’s check if you get everything for the task.
The list includes:
~ Daisies espadrilles machine embroidery pattern.
~ Jute soles (we worked with Prym sole-kits).
~ Fabric for the espadrilles. Prym provides good choice of colors with their espadrilles fabrics, so you can always use their products. For our daisies espadrilles we used upholstery linen (medium weight to be more exact, 350 GMS).
~ Interfacing or/and fabric for the underlining (optional). Prym offers such kind of iron-on underlining, but you can easily substitute it with any solid/patterned material. Word of advice though: opt for cotton based fabrics for your underling (not synthetic ones). Cotton is more agreeable for the skin during high summer temperatures.
Note: Interfacing is optional only with sturdier fabrics. With lighter fabrics interfacing IS NOT OPTIONAL, because without it your espadrilles will come out floppy.
~ Embroidery threads. We strongly suggest you use polyester threads for this particular project. Polyester will stand the tall of numerous washes better than rayon, so do yourself a favor and use poly this time. Madeira, DMC or any other brand will be equally fine.
~ Medium weight tear-away backing and temporary spray adhesive.
~ Embroidery needle. Sharp, 75/11.
~ Sewing threads to sew underlining to the main fabric. You might also need a thimble.
~ Thick thread/yarn and a sharp leather needle/darning needle to sew the fabric part of espadrilles to the soles.
~ Scissors, pins, fabric pen, an iron and a ladle or a long pointy tool (a knitting needle or a chopstick) for turning corners of the sewed parts.
Note: Prym offers all the supplies that you might need for DIY espadrilles. Thick threads, needles, point turners, underlining, fabrics etc. – you can find all that in their series of products for the jute espadrilles soles.
Have you gathered all the supplies? Let’s start making daisies espadrilles then!
1 Step will be watching this Prym video that we’ve got for you down the page. There you’ll find the general flow of the work, which is always helpful when starting a new project, right?
2 Step is where all the elbow grease concerning embroidery is. But don’t worry! We’ll break it down for you into small little steps, making it all plain summer sailing! Oh, and of course, we won’t bother you with long and tedious description of the video instruction. We’ll just cut to the chase with the embroidery part, which starts right after you trace the templates of all of the pieces onto your main fabric. So, watch the video, prepare your fabric and lets the embroidery begin.
1 – Working with the front section of espadrilles.
1.1 – Print out the template of the foot section of Daisies Machine Embroidery Pattern. Make sure to choose the right size. Cut out the template roughly around the design’s outline.
1.2 – Apply the cut-out template onto the traced front piece on the fabric. Mark the axis points (given on the template) onto the fabric. These points will help you hoop the piece correctly.
1.3 – Hoop your fabric aligning the marked axis points on the fabric with those on the bands. If you’re working with fabric of a lighter type, hoop it with the stabilizer. Don’t forget to use your old friend temporary spray adhesive too.
1.4 – Embroider as usual
2 – Working with the heel section of espadrilles
Note: Royal Present Embroidery thinks of every little detail. That is why we’ve provided 2 variations of heel section of daisies embroidery pattern. One (Heel section full size) is meant for the hoops, which can accommodate designs of larger sizes. The other variation (Heel section for connect) is actually the heel section design broken down into 2 pieces. Each of the halves can be embroidered in a hoop with demotions of 130 x 180 mm (5”x7”). Heel section for connect has an alignment mark (a cross) which will make alignment a breeze even for a complete novice.
We deemed it unnecessary to describe heel section full size embroidery process as it’s the same as with the front size. Instead, to save you the reading time, we’ll get down straight to the description, regarding heel section for connect.
2.1 – Print out templates of Daisies Machine Embroidery Pattern heel section for connect. Cut out the designs roughly around their edges
2.2 – Apply the first of the cut-out template of the design onto the traced outline of the heel part on the fabric. Mark axis points.
2.3 – Hoop the fabric with the stabilizer. Make sure axis points that you’ve marked align with marks on the hoop.
2.4 – Embroider. At the end of the process (first half of the heel section), your embroidery machine will stitch out a little red cross (your aligning mark). After that it’ll stop.
2.5 – Un-hoop the embroidered fabric. Hoop a new piece of the stabilizer into the bands.
2.6 – Load the second part of the heel section for connect
2.7 – Stitch the alignment mark (the cross) onto the stabilizer. Stop the machine.
2.8 – Attach the fabric with the help of your temporary spray adhesive onto the stabilizer aligning the two crosses. Use a needle to pinpoint the crosses’ centers for better precision.
2.9 –Embroider. The cross on the first half of the heel section will get covered by the layers of stitching. You won’t have to get rid of it at the end of the embroidery.
Third step: Assembly of the embroidered espadrilles. This step starts after you have finished embroidering and cleaned all the loose ends from the fabric’s “face”. Also you’ll need to remove the excess stabilizer. After you’ve done with the “cleaning” part, continue with the assembly steps as they are shown in the instruction video.
Note: If you’re using fabric of a lighter type, adjust your moves accordingly. Think that you’ll probably need to attach the interfacing before the underlining (or maybe just use either of them instead of both) etc. Use your own judgment to be on the safe side.
Explore fascinating decorative possibilities of pretty white blooms with our Daisies Espadrilles Machine Embroidery Pattern.
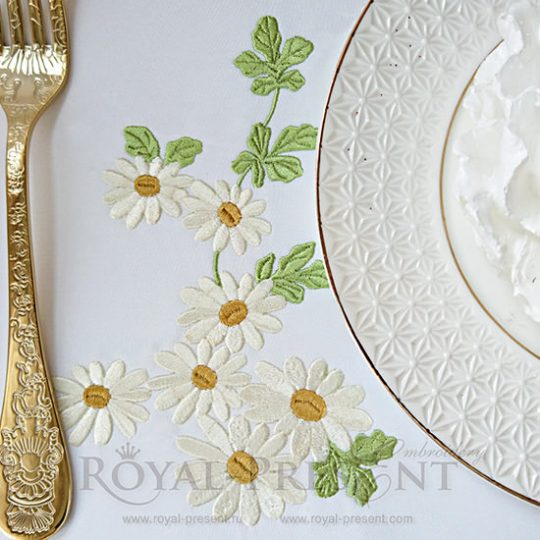
He loves me, he loves me not? Who cares? Stop guessing on daisies about love of silly boys and start cherishing the true love – love for shoes! Treat yourself, your mother or best friend to a pair of newly “blossomed” espadrilles. With so many sizes of daisies embroidery pattern available every girl could get her some brightly embroidered espadrilles. Refresh your wardrobe; create magnificent combos with bags and accessories. Browse all our daisies machine embroidery designs to get inspiration or find a perfect match to Daisies Espadrilles Machine Embroidery Pattern.
You may also like
Machine Embroidery Design Field chamomile

Author: Ludmila Konovalova
My name is Lyudmila Konovalova, and I lead Royal Present Embroidery. Embroidery for me is more than a profession; it is a legacy of my Ukrainian and Bulgarian heritage, where every woman in my family was a virtuoso in cross-stitch and smooth stitching. This art, passed down through generations, is part of my soul and a symbol of national pride.
Date: 13.05.2018

 Get Sign-In Link
 Login with Google
 Login with Facebook
 Login with Amazon
 Login with Paypal